:max_bytes(150000):strip_icc()/__opt__aboutcom__coeus__resources__content_migration__simply_recipes__uploads__2020__08__Coconut-Cream-Pie-LEAD-4-0a8630ee61954ad38973dc7b02fa2b19.jpg)
Both my Black and Puerto Rican cultures take coconut very seriously, so when it comes to this Coconut Cream Pie recipe, I feel compelled to invoke the spirit of my ancestors.
While they hesitate a little when they see bagged coconut flakes, they rejoice at the end result of velvety custard and flaky pie crust. You don’t need ancestral spirits, however, to whip up a creamy custard pie—just a little time and this recipe.
Coconut cream pie is one of my favorites to make because it requires little effort, but final outcome is "looks-like-you-worked-on-it-all-day" delicious!
The individual components of this pie can be prepared a day or two in advance and literally whipped up a couple of hours before dessert time. This is my favorite “So-and-so invited us to dinner tomorrow and asked that I bring dessert” dessert. It travels well and always makes a great impression.
Toasted Coconut Makes All the Difference
One thing that’s different about this coconut dessert is the texture created by folding in toasted coconut. I mean, if we’re going to make a coconut cream pie, we want it to be as memorable as we are.
The addition of toasted coconut not only adds textural interest to the custard, but it also provides a bit of sweetness. Coconut milk in the base of the custard also develops a coconut cream pie that surges with coconut flavor. Because, again, life’s too short for blah pie.
Custard pies shouldn’t be overly sweet, in my opinion. The individual components that make up this pie contain sugar, so the sum of all the pie’s parts can go from perfectly sweetened to cloying in a flash. No one wants cloying pie.
:max_bytes(150000):strip_icc()/__opt__aboutcom__coeus__resources__content_migration__simply_recipes__uploads__2020__08__Coconut-Cream-Pie-LEAD-3-62a787a1f16641cdb0f18dc4e43f9320.jpg)
Tips and Tricks for a Successful Cream Pie
Custards, without exception, are made from a milky base that’s been thickened with eggs and heat. Prior to tempering though, the eggs are aerated by whipping them with the sugar and cornstarch. This step turns the filling into something almost ethereal.
In the case of custard pies, however, I have a few additional tricks up my sleeve.
- Add cornstarch to give the filling enough structure to hold its shape after being sliced.
- Temper your eggs by slowly whisking a little hot milk into them to bring the eggs to the same temperature as the milk. This allows you to acclimate the eggs to the heat of the milk base without curdling them. Once you’ve done that you can safely add the egg to the remaining milk mixture. Failing to temper the eggs increases your chances of ending up with scrambled eggs rather than custard.
- Add the filling to your blind-baked pie crust while the filling is hot. Doing this allows the filling to cool in an even layer—sans the peaks and valleys which develop if you scraped cooled filling into the crust after chilling. Plus, it gives you a clean slice, and it’s just more time-efficient. Granted, if you need to make the pie ahead of time, you can most certainly chill the custard and spoon it into the baked crust.
- When you pour the custard into the pie crust to chill, press a piece of plastic wrap against the custard to prevent it from forming a skin.
:max_bytes(150000):strip_icc()/__opt__aboutcom__coeus__resources__content_migration__simply_recipes__uploads__2020__08__Coconut-Cream-Pie-LEAD-2-f597c5ed32aa45bd916b8dbbec10c1ae.jpg)
Why Blind Bake the Crust
Cream pies are usually made by pouring a filling into a completely cooked crust, then chilling the pie for many hours.
Blind baking is just the phrase used to describe baking the crust of a pie prior to adding your filling. When blind baking a pie crust, it’s important to give your dough time to rest after mixing it. The gluten in the dough wants to shrink when handled excessively and there’s nothing more disheartening than to pull out a baked crust that shrunk in the pan.
Watch and Learn How to Blind Bake a Pie Crust
Tips for Blind Baking the Pie Crust
Before baking the dough:
- Chill the dough after mixing it and before rolling it out for at least 30 minutes to relax it.
- Flute the edges of the dough and seal it to the outer rim of the pie plate to help keep the crust from shrinking during baking.
- Chill the uncooked dough again once you’ve fit it to the pie plate but before you bake it to help further relax the gluten.
When it comes to the actual baking, there are a few ways to prevent the dough from puffing up when baked—after all, there’s no filling inside of it to hold it in place.
- Dock, or prick, the uncooked dough with the tines of the fork prior to baking.
- Place foil or parchment over the dough and fill it with pie weights, raw rice, granulated sugar, or dried beans.
If you have a metal pie tin, now’s the time to use it. Metal conducts heat magnificently, so I recommend it for baking pies. Alas, mine has gone MIA. To compensate, I use a two-stage baking process. The two-step baking process leaves you with a nicely browned bottom and fully baked crust, overall.
- Begin with the weighted pie dough on the lowest rack of your oven.
- Remove the pie weights and move the crust to the middle rack to finish baking.
But, if you have a metal tin, you need not bother with the two-step baking. If you want a step-by-step on blind baking pie crust, read our tutorial: How to Blind Bake a Pie Crust.
Troubleshooting Cream Pies
- Runny custard: You may have undercooked your custard. If it fails to thicken after bringing it to a low boil, it can be fixed by stirring in a slurry of equal parts cornstarch and water. Mix the two together and whisk it into the hot custard. Bring to a boil, stirring, until thickened.
- Lumpy Custard: If you see clumps of scrambled egg in the custard, your eggs probably weren’t tempered properly. To fix this, pour the hot custard through a fine-mesh sieve. Do this prior to adding the coconut flakes.
:max_bytes(150000):strip_icc()/__opt__aboutcom__coeus__resources__content_migration__simply_recipes__uploads__2020__08__Coconut-Cream-Pie-LEAD-5a-d431bb84465b4a568bb5a82830e851eb.jpg)
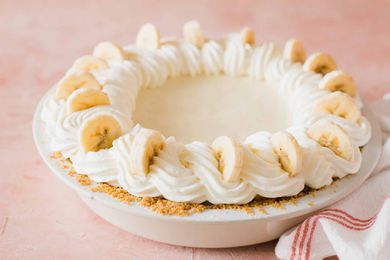
Swaps and Substitutions
- Swap the whipped cream: This pie is topped with whipped cream, but if you’re not into whipped cream toppings, you can turn this into a coconut meringue pie by using the meringue recipe here. The good news is, you’ll already have the bulk of the egg whites needed to make this recipe. The not-so-good news is, you’ll need to eat the pie within 24 hours to avoid a weepy meringue.
- Mix up the spices and extracts: If you want even more coconut flavor, add coconut extract. You can also swap the cinnamon for nutmeg.
Can You Make Coconut Cream Pie Ahead of Time?
Some parts of this coconut cream pie can be made 24 hours in advance.
- The pie crust can be made two days in advance.
- Even the whipped cream can be made two days in advance, but you may need to give a 30-second re-whip to “fluff” it back up.
- The actual filling should be made and poured into the crust as instructed, as opposed to being made and cooled.
How to Store Coconut Cream Pie
I usually go wild with my whipped cream topping, so I hate smooshing it under plastic wrap to store it. If your pie is whole, just store it in the fridge uncovered. If you’ve taken a few slices out, press a piece of wax paper, plastic, or parchment against the exposed interior parts of the pie before sliding it into the refrigerator.
You can store the assembled pie topped with whipped cream in the fridge for three days.
:max_bytes(150000):strip_icc()/__opt__aboutcom__coeus__resources__content_migration__simply_recipes__uploads__2020__08__Coconut-Cream-Pie-LEAD-4b-f66d7b72953f46a1a4f2cf7d6b4dbc81.jpg)
How to Freeze Coconut Cream Pie
You most certainly can freeze the pie after cooling the filling completely. Place that piece of plastic wrap directly on the surface as instructed and wrap the pie tin in another layer of plastic before freezing—make sure your tin is freezer-safe.
The pie may be frozen for two months. Thaw the pie in the refrigerator before topping with the whipped cream and decorating with coconut flakes.
You Want Pie? We’ve Got Pie!
Coconut Cream Pie
Ingredients
- Coconut Pie Filling:
- 2 cups sweetened coconut flakes, divided
- 4 large egg yolks
- 2 large eggs
- 1 cup (200g) granulated sugar, divided
- 1/2 cup (65g) cornstarch
- 1/4 teaspoon ground cinnamon
- 2 (13.5 ounce) cans full fat coconut milk (800ml)
- pinch of kosher salt
- 2 tablespoons (28g) unsalted butter, sliced
- 2 teaspoons vanilla extract
- 1 (9-inch) pie crust
- For the whipped cream:
- 1 1/2 cups heavy whipping cream
- 1 tablespoon granulated sugar
Method
-
Heat your oven:
Preheat the oven to 350°F
-
Roll out and blind bake the pie crust:
Lightly flour your countertop and roll your pie dough into a 12-inch circle. Place the pie dough into your pie plate.
Line with aluminum foil or parchment paper and fill to the top with ceramic pie weights, rice, dry beans, or granulated sugar.
Bake the pie dough at 350°F for 50 minutes to 1 hour, removing the foil liner with the weights during the last 10 minutes of baking time.
Once baked, remove the crust from the oven and allow it to cool completely.
![Pie dough is being crimped by two hands to show how to make coconut cream pie.]()
Marta Rivera ![Blind baked pie crust on a checked linen for the best coconut cream pie.]()
Marta Rivera -
Toast the coconut flakes:
Scatter the coconut flakes onto a sheet pan. Try to break up any large clumps, which prevent even toasting. Bake the coconut on the middle rack of your oven for 5 minutes.
Remove the pan from the oven and use a spatula to toss the coconut flakes. Arrange them into an even layer and return the pan to the oven to bake for another 5 minutes.
Continue this process, once more, checking after 3 minutes instead of 5. Once the coconut is evenly browned, remove the pan from the oven and allow the coconut to cool completely.
Toasting the coconut can be done a week in advance and the flakes stored in a sealed container at room temperature.
![Shredded coconut is toasted on a baking sheet. A small cup has additional coconut inside on the sheet pan.]()
Marta Rivera -
Begin making the coconut custard:
In a mixing bowl, whip the egg yolks and whole eggs together with a hand mixer on high. Sift 1/2 cup of the sugar, cornstarch, and ground cinnamon into the bowl over the beaten eggs and whip until lemony yellow in color—about 2 minutes. Set aside.
In a saucepan, stir together the coconut milk, the remaining 1/2 cup of sugar, and the salt together.
Heat the mixture over medium heat, whisk constantly to dissolve the sugar until the mixture begins to steam.
-
Temper the eggs:
Slowly add 1 cup of the hot milk to the whipped egg mixture in a slow stream while whisking constantly. This will bring the eggs to the same temperature as the milk and prevent curdling. The mixture will foam up a bit.
![How to make coconut cream pie by slowly adding the warm milk to the egg mixture for the filling.]()
Marta Rivera -
Combine the tempered eggs and the remaining milk:
Pour the tempered egg mixture back into the pot with the milk, stirring constantly. Bring the mixture to a gentle boil, which should take about 2-3 minutes. Incorporate any foam that may form on the surface by whisking in a figure-eight motion.
The mixture should begin to thicken almost immediately after it comes to a boil. Once you see the custard has thickened, and bubbles pop slowly on the surface, remove it from the heat and check for proper consistency.
The custard is ready when it coats the back of a spoon. If you run your finger through the custard, it will leave a clean line and won't rejoin itself. Once thickened, remove it from the heat.
![A saucepan of thick custard is on the stove and a wooden spoon is coated in the custard.]()
Marta Rivera -
Flavor the custard and fill the pie crust:
Stir the butter and vanilla extract into the hot custard. When the butter is completely melted and blended, stir in 1 3/4 cups of the toasted coconut.
Pour the warm custard into the pre-baked pie shell and press a lightly oiled piece of plastic wrap directly onto the surface of the custard. This keeps the surface of the custard from forming a skin as it chills in the refrigerator.
Refrigerate the pie for 6 to 8 hours or until it’s completely chilled.
![Coconut cream pie filling is being added to a baked pie crust for homemade coconut cream pie.]()
Marta Rivera ![Saran wrap is placed on the top of the pie and filling for an easy coconut cream pie.]()
Marta Rivera -
Make the whipped cream:
Just before you’re ready to serve, add the heavy whipping cream to a mixing bowl. Beat the cream on medium-high speed until it begins to foam.
While beating, gradually sprinkle the sugar over the cream. Continue beating the cream until semi-stiff peaks form. The peaks should hold their shape when the beaters are lifted from the bowl.
-
Finish the pie:
Remove and discard the plastic wrap from the pie. Scoop the whipped cream onto the filled pie. Use the back of a large spoon to spread the whipped cream onto its surface. Sprinkle the remaining 1/4 cup of toasted coconut over the whipped cream.
![A spoon spreads whipped cream over the top of the best coconut cream pie.]()
Marta Rivera ![Overhead view of a homemade coconut cream pie with a small container of toasted coconut to the right.]()
Marta Rivera -
Serve and enjoy:
Refrigerate the pie until you’re ready to serve. The Coconut Cream Pie tastes best if eaten within 48 hours, but it will last for up to 3 days.
Leftovers! Store leftovers in the refrigerator. Press a piece of wax paper against any exposed coconut custard.
:max_bytes(150000):strip_icc()/__opt__aboutcom__coeus__resources__content_migration__simply_recipes__uploads__2020__08__Coconut-Cream-Pie-METHOD-2-b266c502312c4f718a6328a9c43fbc04.jpg)
:max_bytes(150000):strip_icc()/__opt__aboutcom__coeus__resources__content_migration__simply_recipes__uploads__2020__08__Coconut-Cream-Pie-METHOD-3-6eb0ccd293fb4d3dac40aae3a49d7503.jpg)
:max_bytes(150000):strip_icc()/__opt__aboutcom__coeus__resources__content_migration__simply_recipes__uploads__2020__08__Coconut-Cream-Pie-METHOD-1-d737a1a974e34a3a985fcdc3df6e8ac6.jpg)
:max_bytes(150000):strip_icc()/__opt__aboutcom__coeus__resources__content_migration__simply_recipes__uploads__2020__08__Coconut-Cream-Pie-METHOD-8-696e2e5747ba4afcb5fba5dafd312a3c.jpg)
:max_bytes(150000):strip_icc()/__opt__aboutcom__coeus__resources__content_migration__simply_recipes__uploads__2020__08__Coconut-Cream-Pie-METHOD-4-19c0696ec65741ea8b365ca3f15e6af8.jpg)
:max_bytes(150000):strip_icc()/__opt__aboutcom__coeus__resources__content_migration__simply_recipes__uploads__2020__08__Coconut-Cream-Pie-METHOD-5-46db48d4818c42228b6cc1654e7cf991.jpg)
:max_bytes(150000):strip_icc()/__opt__aboutcom__coeus__resources__content_migration__simply_recipes__uploads__2020__08__Coconut-Cream-Pie-METHOD-6-7bd3a5236d96473e95ee14bdf213ec67.jpg)
:max_bytes(150000):strip_icc()/__opt__aboutcom__coeus__resources__content_migration__simply_recipes__uploads__2020__08__Coconut-Cream-Pie-METHOD-9-8b6c31a02c9242d39bf90614985e1748.jpg)
:max_bytes(150000):strip_icc()/__opt__aboutcom__coeus__resources__content_migration__simply_recipes__uploads__2020__08__Coconut-Cream-Pie-METHOD-10-b1564275757d49c78593642ffb7d3756.jpg)